
How to set up Profiles and Roles
Introduction
A profile allows you to define permissions for users to give them full or restricted access to modules and records. Through a profile it is defined whether the user can see or edit objects and records.
When a profile is associated with a role, the access rights defined in the profile are applied to all users having the role.
Here`s a quick scenario on setting up Back Office Manager profile and role.
Creating a Profile
1. Go to Accounts>Profiles.
2. In the Profiles section, click + icon locate on the right side.
3. In the Profiles Info page enter the name of the new profile.
4. In the Display tab mark objects to choose permissions.
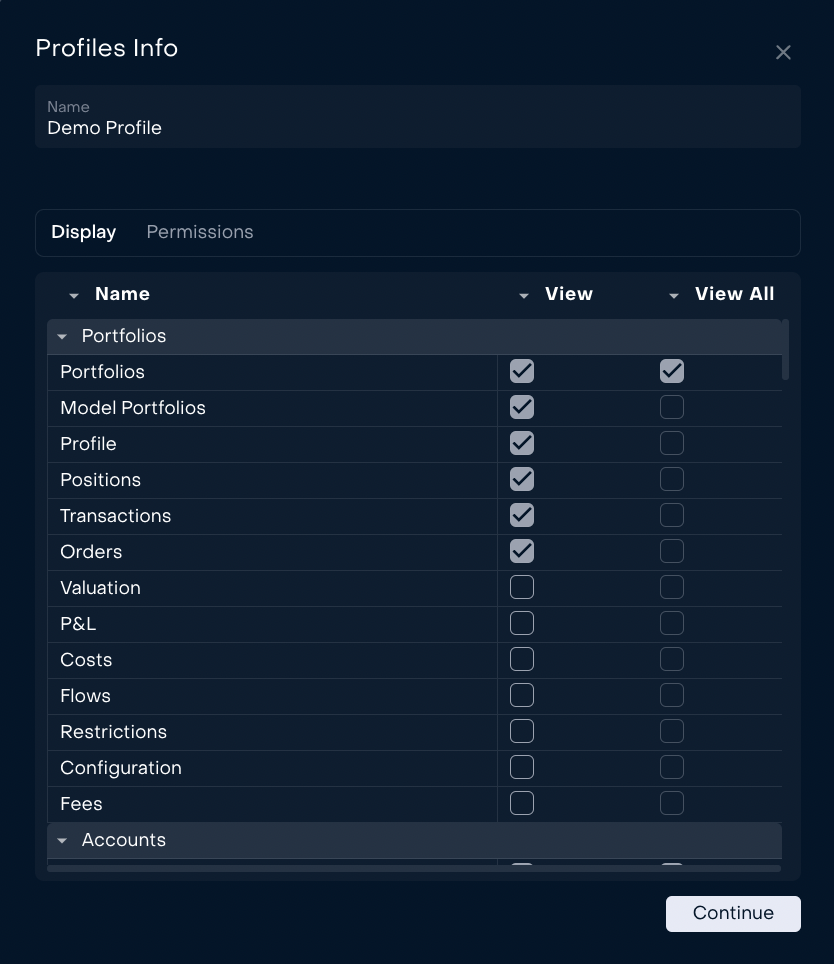
5. Click Continue.
6. In the Permissions tab mark objects to choose permissions.
It is possible to choose permissions for objects with view/view all permission in the Display tab.
7. Click Continue. A profile preview window with configured permissions will open.

8. Click Save if a profile is configured correct. You can make changes by clicking on Edit.
Defining Profile Permissions
Profile info page contains objects grouped by sections. For example Accounts section contains the list of
Clients, Managers, Companies, Accounts etc. If user does not have view/view all permission for Clients he won’t see client list in this section.
Also there are some objects that can’t be created or modified. For such tabs system has just view
permission that influences on display/hide rules.
Permissions lets you define which object the users associated to that particular profile will have access to. You can also specify what actions they can perform.
The permissions for actions include:
View - gives the access to view the record for which user are responsible;
View All - gives the access to view all records in user’s company;
Modify - gives the access to edit the record for which user are responsible;
Force Mofify - gives the access to edit the record without approval responsible person;
Create - gives the access to create the record;
Delete - gives the access to delete/deactivate the record for which user are responsible;
Modify All - gives the access to modify all records in user’s company;
Assign - gives the access to assign the record for which user are responsible;
Status - gives the access to view and edit the record status.
Editing a Profile
Go to Accounts>Profiles.
Hover on a profile in the hierarchy.
Select Edit in the three dots menu opposite the selected Profile.
In the Profile page, update the new properties for the Profile.
Click Save.
Only users with Administrator profile can change Profiles and Roles.
Duplicating a Profile
At times you may want to duplicate profiles to create similar ones and customize them as needed. To duplicate a profile, select Duplicate in the three dots menu next to the profile name and click Duplicate.
How to set up User Roles
A role reflects the part that the user plays in the company hierarchy. You can fix your organization-wide role hierarchy with the help of Roles.
Key points to understanding roles
Role doesn’t influence directly in user access. A role always works with respect to Profiles. Whether the current user has an access to a specific record is determined by the user’s profile - role just expands the number of available records.
There is a Client role which is not editable and can not relate to other roles. There is no hierarchy between Clients - hierarchy is just for manager purpose.
Important Fields in Roles
Field name | Description |
|---|---|
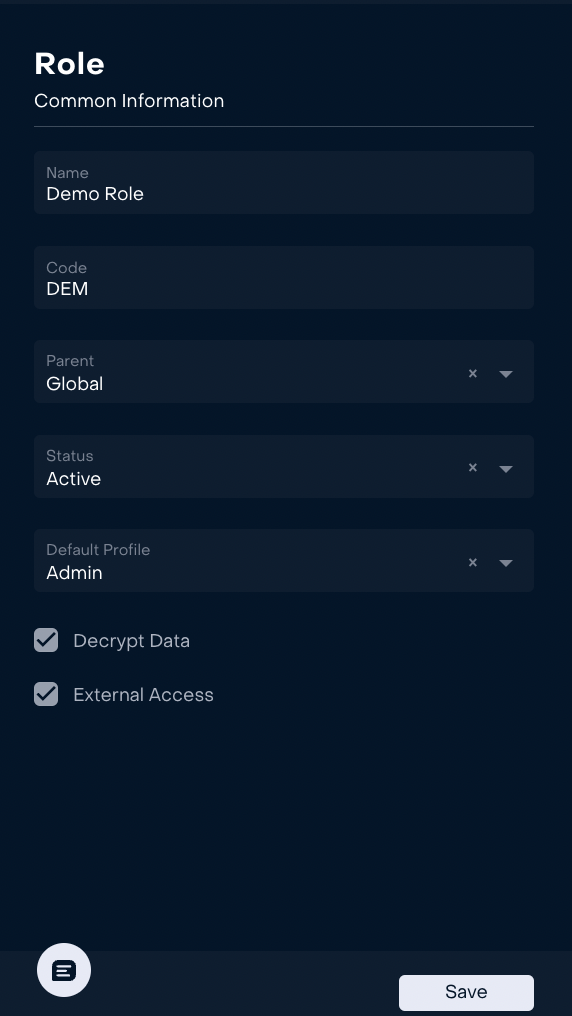
Name | Mandatory field |
Code | Mandatory field |
Parent | Mandatory field Users with the role specified in Name report to users with the role specified in the Parent field. |
Status | Mandatory field The status of the role. The active status is set by default. |
Default Profile | Mandatory field Link to the Profile that by default corresponds to this Role. |
Decrypt Data | Display of encrypted data. If the checkbox is selected, the data will be decrypted. |
External Access | The ability to connect from any IP address. If the checkbox is not selected, the IP address field will appear. |
IP Addresses | IP address to establish a connection. |
Creating a Role
To create new roles
1. Go to Accounts>Roles.
2. In the Roles section, click + icon locate on the right side.
3. Enter the details in the Role page:
Enter the Name;
Enter the Code;
Select the Parent from the drop-down list to define hierarchy of created Role;
Global and Client roles can exist in the system without a Parent Role.
Select the Status of Role;
Select the Default Profile to link to the Profile that by default corresponds to this Role;
Select the Decrypt Data check box if you would like to enable;
Tick the External Access check box if you would like to enable;
2. Click Save.
Editing a Role
Go to Accounts>Roles.
Hover on a role in the hierarchy.
Select Edit in the three dots menu opposite the selected Role.
In the Role page, update the new properties for the role.
Click Save.
Deleting a Role
Similar to how an employee transfers their responsibilities to another employee when leaving a company, you must transfer ownership of records to another role when you are deleting one.
To delete a Role
Go to Accounts>Roles.
Hover on a role in the hierarchy.
Select Delete in the three dots menu opposite the selected Role.